Cardboard Christmas Decorations: Stars, Trees and Ornaments
Three natural-looking holiday projects drawn from measurements: a slot-together tabletop tree, a layered five-point star laid out with a compass, and flat hanging ornaments with white painted accents.

Project at a glance
Materials
- Single-wall corrugated cardboard
- Thin paperboard
- Metal ruler, pencil and compass
- Craft knife and cutting mat, plus scissors
- White (PVA) glue
- White acrylic paint and small brush
- Hole punch and twine
Plain kraft brown with a little white paint has a quiet, natural look that suits winter greenery, and that is the idea behind these cardboard Christmas decorations. There are three projects: a tabletop tree that slots together without glue, a layered star drawn with a compass, and a set of flat ornaments on twine.
All three are drawn from measurements, so you can scale them up or down. One medium shipping box is enough for the set.
Materials for All Three Projects
- Clean single-wall corrugated cardboard, roughly 1/8 in (3 mm) thick, for the tree and star
- Thin paperboard (cereal-box weight) for the ornaments, if you want to cut them with scissors
- Metal ruler, pencil and a compass
- Craft knife and cutting mat, plus scissors
- White (PVA) glue
- White acrylic paint and a small brush
- Hole punch and twine
Safety note
Cutting corrugated board with a craft knife is a job for an adult. Use a cutting mat and a metal ruler, make several light passes instead of one hard one, keep your fingers behind the cutting path and cut away from your body. Work with a sharp blade and cap or retract it when you put it down. The star and the ornaments can be cut with scissors from thin paperboard instead.
Slot-Together Tabletop Tree
Two identical triangles cross at right angles and hold each other up. The finished tree is 9 in (23 cm) tall and 6 in (15 cm) wide.
- Draw a rectangle 6 x 9 in with the flutes running along the 9 in side. Upright flutes keep the tree stiff.
- Mark the center of the top edge, 3 in (7.5 cm) from each corner. Join that mark to the two bottom corners. This is the tree.
- Draw the center line from the tip straight down to the base. Mark its midpoint, 4 1/2 in (11.5 cm) from either end.
- Cut out the triangle, then cut a second one exactly the same.
- On the first triangle, cut a slot along the center line from the tip down to the midpoint. On the second, cut a slot from the base up to the midpoint. Make each slot as wide as your board is thick, about 1/8 in.
- Slide the second triangle down over the first until both bases sit level on the table.
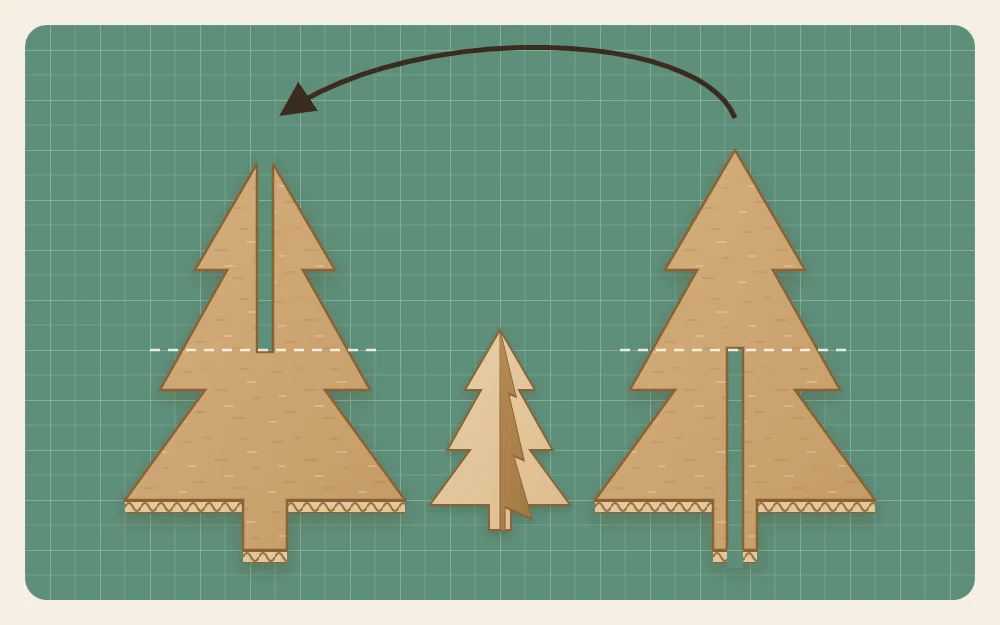
The two slots add up to the full height, 4 1/2 + 4 1/2 = 9 in, which is what lets the bases line up. If the fit is tight, widen a slot by a sliver instead of forcing it.
For a tree with branches, cut three shallow V-shaped notches into each sloping side before you cut the slots. Keep the notches at least 1 in (2.5 cm) away from the center line so the middle stays strong. To resize, keep the height at about one and a half times the width and make each slot half the height.
Layered Five-Point Star
Three stars of decreasing size are stacked into one relief star about 6 in across. Each star starts as a circle with five evenly spaced points on it.
To space the points without a protractor, set the compass to the step in the table and walk it around the circle. The step is the radius multiplied by about 1.18.
| Layer | Circle radius | Compass step |
|---|---|---|
| Back | 3 in (7.5 cm) | 3 1/2 in (8.8 cm) |
| Middle | 2 1/4 in (5.7 cm) | 2 5/8 in (6.7 cm) |
| Front | 1 1/2 in (3.8 cm) | 1 3/4 in (4.5 cm) |
- Draw the circle with the compass. Mark one point at the top.
- Reset the compass to the step. Put its point on your mark and make a small arc across the circle. Move to that arc and repeat until you have five marks.
- The fifth step should land back on the first mark. If it falls short or overshoots, adjust the compass very slightly and step around again.
- Join every second mark with a ruler: first to third, third to fifth, fifth to second, second to fourth, fourth to first. The five lines form a star.
- Cut around the outline of the star only, ignoring the lines that cross inside it.
- Glue the three stars together with their centers and points lined up. The compass holes mark the centers.
For deeper shadows, glue a small square of scrap cardboard between each pair of layers. A loop of twine glued between the back and middle layers at the top point turns the star into a hanging decoration.
Flat Hanging Ornaments
These are simple silhouettes with a punched hole. Draw each one directly on the board:
- Circle: set the compass to 1 1/2 in for a 3 in circle.
- Bell: draw a rectangle 3 x 3 1/2 in (7.5 x 9 cm) and a center line down it. Sketch half a bell on one side: narrow at the top, flaring out to the full width at the bottom. At three or four heights, measure from the center line to your curve, mark the same distance on the other side and join the marks, so both halves match.
- Small tree: draw a rectangle 3 x 4 in (7.5 x 10 cm) and join the center of the top edge to the two bottom corners.
Cut the shapes out, then punch a hole about 3/8 in (1 cm) below the top edge of each. Thread an 8 in (20 cm) length of twine through the hole and knot the ends to make a loop.

Adding White Accents
Good places for white are a border about 1/4 in (6 mm) wide around each ornament, the top layer of the star, and dots or short dashes along the sloping edges of the tree.
Use paint straight from the pot, in thin coats, and let the pieces dry flat. Paint the tree halves before you slot them together. The guide to painting cardboard explains how to stop flat shapes from curling as they dry.
Displaying Them Safely
Cardboard burns, so these decorations belong well away from open flames, heaters, stoves and fireplaces. If you want lights nearby, use battery-operated LED string lights only, and switch them off when you leave the room.
Kept dry, the whole set stores flat in an envelope for next year: just slide the two tree halves apart.
More Decorations in the Same Style
A row of small decorative cardboard houses makes a winter village to stand beside the tree. For something more sculptural, the faceted shapes in the guide to geometric cardboard decor can be made small, threaded with twine and hung as three-dimensional ornaments.
Frequently asked questions
How do I draw a five-point star without a protractor?
Draw a circle, then set your compass to the radius multiplied by about 1.18 and step it around the circle from a starting mark. Five steps bring you back to the start and give five evenly spaced points. Join every second point with a ruler and the star appears.
Why will my slotted tree not stand straight?
Usually the slots are not exactly on the center line, or their lengths do not add up to the full height, so one base sits higher than the other. Check that both pieces are identical and that each slot stops at the midpoint. A slot much wider than the board also lets the tree lean.
Can I put lights on cardboard decorations?
Battery-operated LED string lights are the only sensible choice, because cardboard burns. Drape them loosely around the pieces instead of taping them on, switch them off when you leave the room, and keep the decorations away from open flames, heaters and other sources of heat.
