Geometric Cardboard Decor: Simple 3D Shapes to Make
Draw and fold three faceted shapes from thin paperboard with a ruler and compass: a cube, a square-based pyramid and an eight-sided gem, each with net dimensions, tab counts and resizing rules.

Project at a glance
Materials
- Thin paperboard
- Metal ruler and pencil
- Compass
- Scissors
- Bone folder or other blunt scoring tool
- White (PVA) glue or tacky glue
- Acrylic paint and masking tape
Geometric cardboard decor needs very little: a flat pattern, a few scored lines and some glue turn a cereal-style box into a crisp faceted object for a shelf or table. The shapes look precise because the geometry does the work, not because the making is hard.
Here are three to draw yourself with a ruler and compass: a cube, a square-based pyramid and a faceted gem, which is an octahedron. All three use 3 in (7.5 cm) edges so they sit well together, and all three are cut from thin paperboard with scissors.
What You Need
- Thin paperboard (cereal-box weight), one large panel per shape
- Metal ruler, sharp pencil and a compass
- Scissors
- A blunt scoring tool, such as a bone folder
- White (PVA) glue or tacky glue, and a few clothespins
- Acrylic paint and masking tape for the color blocks
Rules Shared by All Three Nets
Draw each net on the printed side of the board so the plain side ends up outside. Every glue tab is 1/2 in (1.2 cm) wide with its two ends cut at a slant, so tabs do not collide inside the corners.
Score every fold line and every tab line before cutting the net out; the method is in the guide on how to score and fold cardboard. Fold everything toward the printed side and dry fit the shape before any glue goes on. If you want to know why each net has the number of tabs it does, the guide to designing your own nets explains the counting rule.
The Cube
You need a blank about 10 x 12 1/2 in (26 x 32 cm).
- Draw a column of four 3 in squares, 3 in wide and 12 in (30.5 cm) long.
- Add one more square on each side of the second square in the column. That makes six squares in a cross.
- Add seven tabs: one on each of the three free edges of both side squares, and one on the free end of the last square in the column.
- Score, cut out and fold. Glue the side squares to their neighbors first, working around the cube.
- For the last face, put glue on the remaining tabs, close the face and set the cube on the table with that face down for a minute or two.
A cube has twelve edges. Five are folds in this net, which leaves seven seams, hence seven tabs.
The Square-Based Pyramid
You need a blank about 9 in (23 cm) square.
- Draw a 3 in square in the center of the blank.
- Set the compass to 3 in. From the two ends of one side of the square, strike two arcs outside the square. Where they cross is the tip of a triangle; join it to both ends of the side.
- Repeat on the other three sides. You now have four equilateral triangles around the square, each about 2 5/8 in (6.6 cm) tall, and a star-shaped net about 8 1/4 in (21 cm) across.
- Add four tabs, one on the right-hand edge of each triangle as you look outward from the square.
- Score, cut out, fold the triangles up and glue the seams one at a time, pinching each for about a minute.
The finished pyramid stands about 2 1/8 in (5.4 cm) tall. For a steeper one, keep the square but set the compass to 4 in (10 cm); on a blank about 11 in (28 cm) square, that gives a pyramid roughly 3 3/8 in (8.6 cm) tall.

The Faceted Gem (Octahedron)
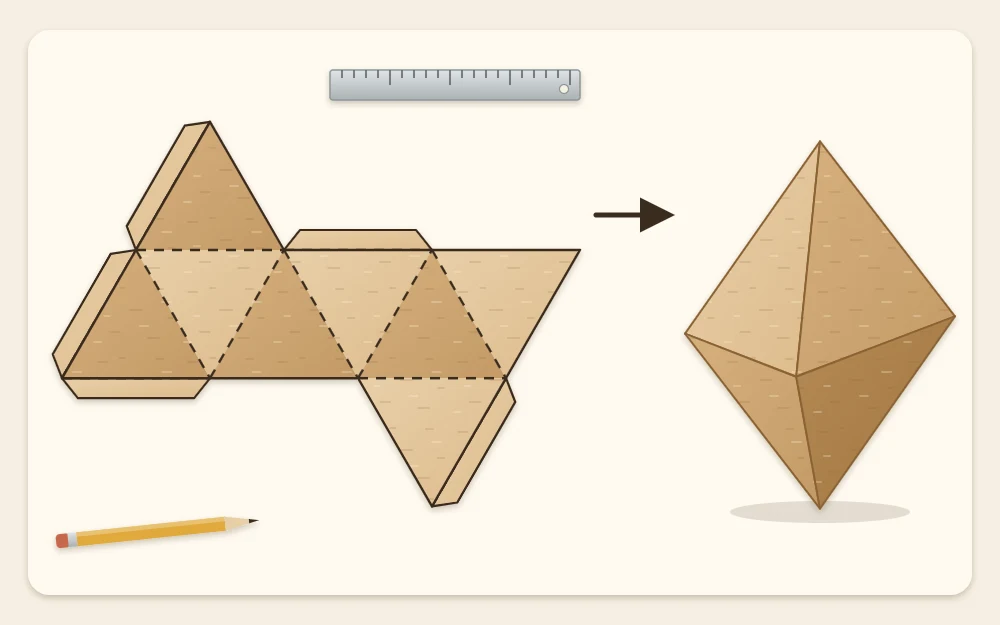
An octahedron has eight equilateral triangle faces. Its net is a row of six triangles with one more above and one below. You need a blank about 12 x 9 in (30 x 23 cm).
- Draw a baseline 9 in long, about 3 in up from the lower edge of the blank and starting near the left edge. Mark it every 3 in, giving four marks.
- With the compass at 3 in, strike arcs above the line from each neighboring pair of marks. The three crossing points lie in a row. Rule a top line through them and extend it to the right, then mark a fourth point 3 in beyond the third.
- Join the marks in a zigzag: first bottom mark to first top point, down to the second bottom mark, and so on to the last top point. Between the two long lines you now have six triangles, pointing up and down in turn.
- Add the two caps the same way with compass arcs: one triangle above any of the three sections of the top line, and one below any of the three sections of the baseline.
- Add five tabs: one on a slanted end of the row, and one on each of the two free edges of both caps.
- Score and cut out. Curl the row into a ring and glue the end tab; the six triangles form a band that zigzags around the middle.
- Fold one cap over and glue its two tabs. Glue the tabs of the last cap, close it and hold it gently for a minute or two.
The gem measures about 4 1/4 in (10.8 cm) from one point to the opposite point. Resting on a face, it is about 2 1/2 in (6.2 cm) tall.
Paint in Blocks of Color
One painted face per shape, with the rest left plain, is usually enough. The easiest moment to paint is while the net is still flat: mask the neighboring faces with masking tape along the scored lines, brush on two thin coats of acrylic and let them dry before folding. The guide on painting cardboard without warping explains why thin coats matter on board this light.
Resize and Group the Shapes
Every measurement follows from the edge length, so resizing is simple: choose a new edge, set the ruler and compass to it, and keep the tabs at 1/2 in. An equilateral triangle is about 0.87 times as tall as its edge, which tells you how large a blank to cut.
Beyond edges of roughly 4 in, thin paperboard faces begin to bow. Use chipboard for larger shapes and widen the tabs to 3/4 in (2 cm).
On a shelf, odd numbers look most natural. Try three shapes of one kind with 2, 3 and 4 in edges, or one of each kind with a single shared color. They are light decorative objects, so keep them somewhere dry where they will not be knocked or stacked under anything heavy.
Frequently asked questions
What is the easiest geometric shape to make from cardboard?
The cube is the easiest to draw because its net is six squares, but the pyramid is the quickest to glue, with only four seams. If you have never folded a net before, start with the pyramid, then the cube, and leave the eight-sided gem for third.
Why do my shapes have gaps at the corners?
Gaps usually come from fold lines that were not scored exactly on the pencil line, or from tabs with square ends that bump into each other inside the shape. Score against a ruler, cut the tab ends at a slant, and dry fit before gluing so you can trim anything that binds.
Can I make these shapes from corrugated cardboard?
You can for larger sizes, but corrugated board is too thick for small, sharp folds, and tabs become bulky. For edges of about 3 in, thin paperboard gives much crisper corners. For shapes with edges well above 4 in, chipboard or single-wall corrugated starts to make more sense.